Create
Steps to follow as shown below:
1. Click System Configuration then Click Schedule and then click on create
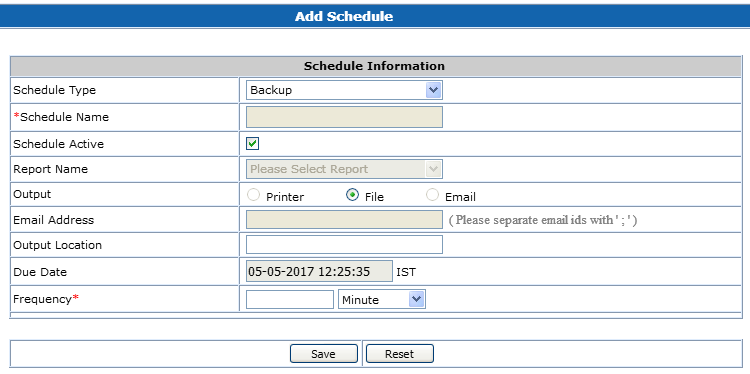
2. Add Schedule page appears on the screen as shown below:

3. Enter the relevant details:
4. Schedule Type - This drop down has two options:
a) Backup option is used to schedule the data backup.
Schedule Active - Check box to enable or disable the schedule.
Output Location - Path where you want to save the backup data or report. The file will be stored where EnviroConnect is installed.
Due Date - Next scheduled date for data backup generation.
Frequency - The periodicity of the schedule just defined. You also need to select the proper time resolution from the next drop down (Minutes, Hours, Days, Weeks, Months)
Please note that administrator should periodically check back and restore it to ensure that it is happening properly.
b) Report option is used to schedule the report generation.
Schedule Active - Check box to enable or disable the schedule.
Report Name - List of all the available reports. You need to select the report you want to schedule.
Depending on selected report following controls are displayed and the report is run based on these selections
Plant
Group - Site or RTDAS
Device
Output - It has two options:
a) Email option is to generate report and send by email.
b) File option is to save the report to disk.
Output Location - Path where you want to save the report.
Due Date - Next scheduled date for data report generation.
Frequency - The periodicity of the schedule.
Report Parameters - if any additional parameters are required for a report, they will appear here. User should provide values for each parameter
Select Report Parameters button- For some reports, this button is provided. It opens a form where user can select parameter values instead of giving free text entries.
5. Click on Save.
